Showing posts with label Embossing. Show all posts

Monday, 13 August 2018

SCRAP N' STAMP~ Painted Rose

Happy Monday! I'm here today with a fun lil' make for SCRAP N' STAMP using Concord & 9th's PAINTED ROSE Stamp Set. 


For more details on how I made this card, check out my post here

Thanks for joining me today!

Wednesday, 30 May 2018

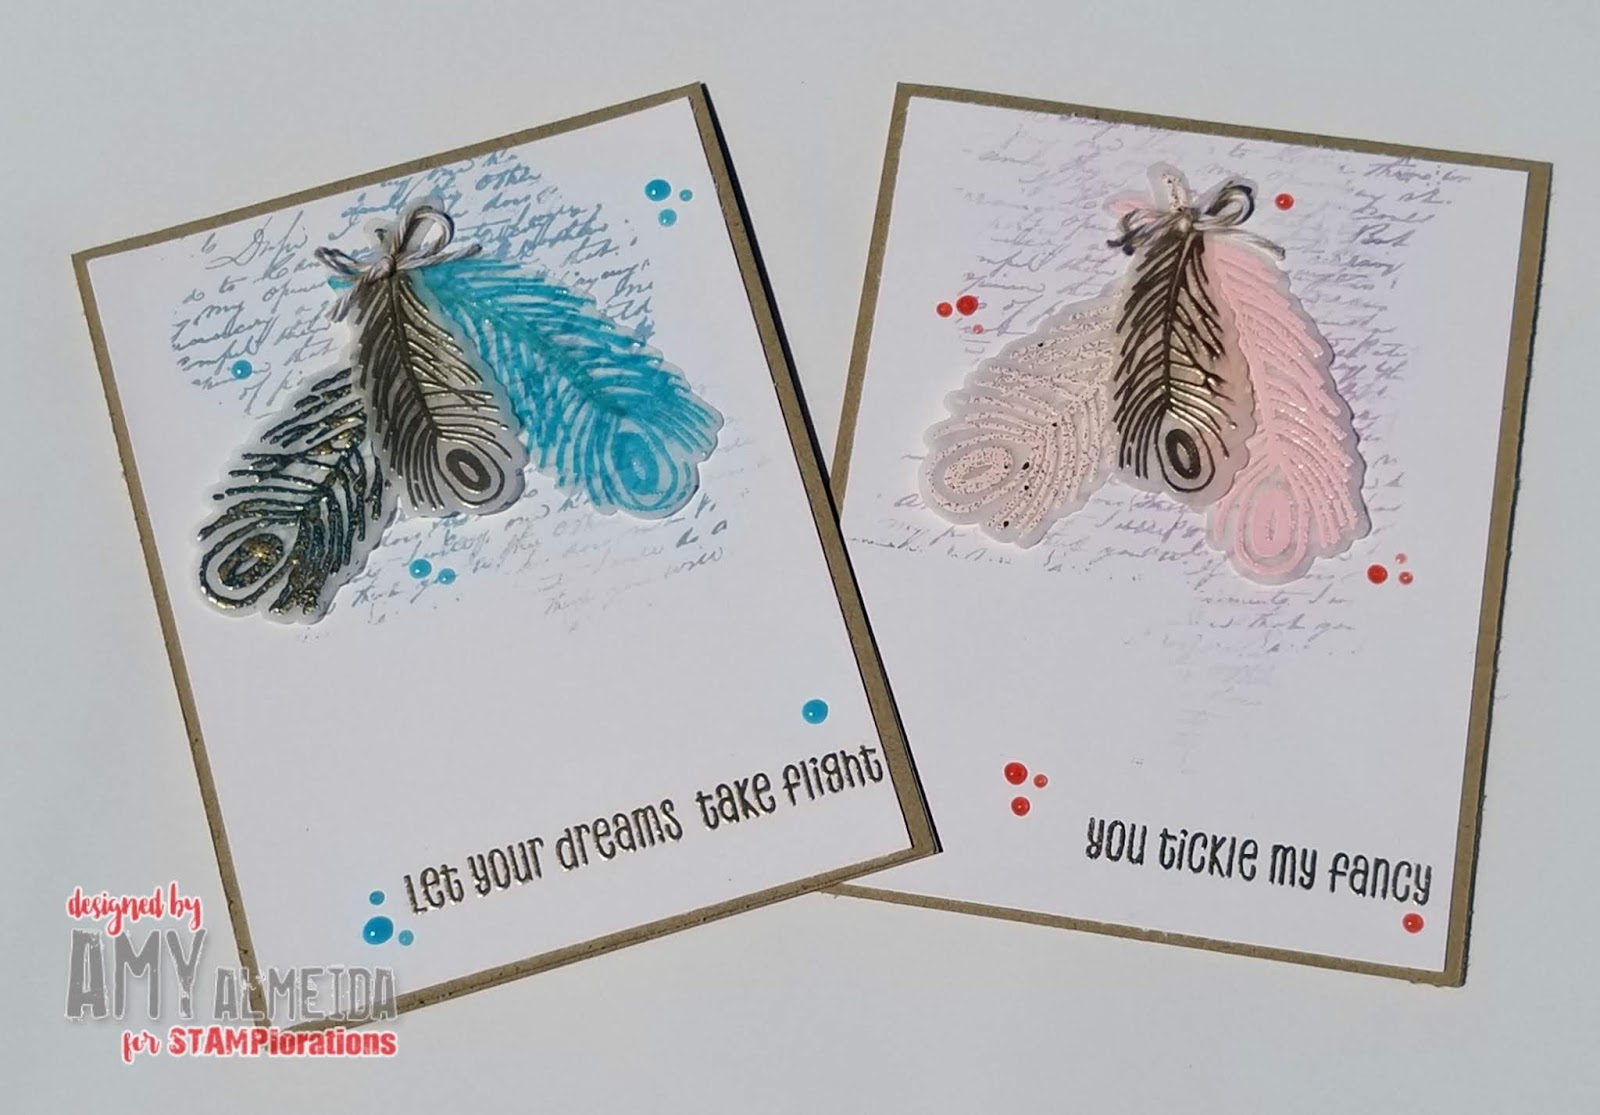
STAMPlorations~ Spotlight ~ Vellum & Feathers


Hello and happy Wednesday Crafty Friends, I'm up on the STAMPlorations blog with a CAS "Feathery Delights" tutorial using the STAMPlorations Feathery- October 2017 Stamp set and matching dies.  

Be sure to check out the STAMPlorations blog for the step-by-step tutorial. :o)

Here are my Feathery Delights:


Thank you so much for stopping by, and I hope I've inspired you to emboss/stamp on Vellum and get Crafty today! Oh and don't forget if you use code "STAMPGIRLAMY" you can get 20% off your purchase at the STAMPlorations Shop


Friday, 16 December 2016

STAMPlorations~ Stencil Hop Day 3~ Embossed Hearts

Good Morning and happy Friday everyone! I'm here today with another make for Day 3 of the
http://stamplorations.blogspot.com/2016/12/artplorations-stencil-hop.html

There are some amazing prizes up for grabs...check out the info here and get hoppin'! :o)

Today, I am embossing using the Hearts All Over Stencil
 I started by embossing my 90lb Cardstock using the stencil as an embossing folder and then blending Lipstick Red Distress Ink over the whole card base. I love the softness this technique lends to the background. I kept it CAS and just added some glitter tape, painted chipboard heart and a Tim Holtz "Small Talk" Sticker.


I hope you join me on Monday the 19th to see my last lil' make for this Stencil Blog Hop. :o)


Saturday, 10 December 2016

Two Paper Divas~ Sending Warm Thoughts

Happy Saturday everyone, I'm back to share with you my final make for  Two Paper Divas  using a sentiment from the "One Cup At A Time" stamp set. 


I lurve coffee....so I love this stamp set as the sentiments are perfect...and I thought this one could be used for Christmas as well...just add "This Christmas" sentiment inside. :o)


I got the idea for this card from Kristina Werner's post here. She used Watercolor paints and I used Distress Inks and changed up the snowflakes.  She has amazing videos so be sure to check her out and leave her some love!


I started with a 4' x 5.25' piece of watercolor cardstock and blended Distress Inks (Seedless Preserves, Candied Apple and Picked Raspberry) with a blending tool. I then embossed with We R Memory Keepers GEOMETRIC embossing folder. I then embossed a Spellbinders Snowflake Diecut with "Stardust" Embossing powder. I added the sentiment that I embossed onto vellum in white EP and die cut. I finished with a little coffee mug die cut from my stash that I stamped a lil' snowflake on it.  

It's been an honor and a pleasure designing for Gayla and Melissa from Two Paper Divas this year. These ladies are truly beautiful inside and out and I wish them all the best in their retirement. xx


Don't forget to check out the Two Paper Divas Store as everything is now 50% off...that's right 50%! The store will close on Dec 15, 2016 , so go on and get your favorites now because supplies are limited and once they are gone they are gone.


I'd like to enter this into the
http://coffeelovingcardmakers.com/2016/12/2017-winter-coffee-lovers-blog-hop/


Friday, 2 December 2016

STAMPlorations~ Vibrant Floral Art Journal Page

Good Morning friends, I'm over on the STAMPlorations blog today with a quick and fun tutorial for a vibrant art journal page. 


You can check out my step-by-step tutorial here.

Supplies used
http://stamplorations.auctivacommerce.com/Bloom-Factory-ARTplorations-Stencil-P5319933.aspx


http://stamplorations.auctivacommerce.com/Big-Bloom-Factory-Shery-Russ-Designs-P5620015.aspx

Other Supplies: Distress Ink (Candied Apple, Crushed Olive, Fossilized Amber, Picked Raspberry, Broken China, Carved Pumpkin and Seedless Preserves), Recollections White Detail Embossing Powder, Scissors, Old Book Paper  and Ranger Collage Glue Stick.
  

Friday, 14 October 2016

Joggles~ Creepy & Cute Coffins

Good morning crafty friends! I'm back to share with you some creepy cute coffins I made for 

I used the fun Halloween Stamps Joggles carries from Lisa Bloobel and Red Wooden Flag.

 I used wooden coffin's from Michael's and Top Hat, Spider #2 and  Ghost Joggles Cling Mounted Rubber Stamps. 

 How cute is that Shrinky Dink "Top Hat" Skeleton in his little coffin?

If you'd like to see my step-by-step tutorial, please check out the Joggles blog here

I sure hope I've inspired you to try the cute and creepy array of Halloween stamps that Joggles carries and the different ways you can use them!


Thanks for stopping' by, I sure hope I've inspired you to get crafty today. 


Monday, 15 August 2016

Stamplorations~ Tutorial~ Altered Frame

Good morning y'all and happy Monday! I'm here to share with you a fun altered project and tutorial I made for STAMPlorations


I love going to garage sales and picking up all sorts of odd and ends...usually to alter them in some way. A month ago I came across a frame with a quote inside...and knew I could turn it into something I could use to hang my lil' makes in my craft room.


Pretty, but not for me. So here's my process on how I altered the frame :

I started by taking out the center panel with the quote.


I gave it a good coat of gesso


I used Dylusions Calypso Teal Paint and gave it 2 coats.


After it dried, I used the Mini Honeycomb Delight Stencil with Lemon Zest Dylusions Paint and a mini blending tool.


While the frame was drying, I taped off the Mini Bold Florals Stencil so that only one them was visible. I then used Bubblegum Pink Dylusions Paint with the stencil onto tissue paper. I also stamped a few circles from the Artsy Border Maker with Black Archival ink onto the tissue paper. I then cut them all out.


I used flowers from the Big Bloom Factory stamp set and embossed them with white embossing powder onto watercolor paper.I used distress inks to color them up and then fussy cut them out.


Now here's the fun part. :o) I turned the frame over onto it's backside and grabbed some multicolored twine and a staple gun. I stapled the twine in different directions until I was happy with the design. I used heavy duty duct tape on the ends to ensure they stayed put.


I then added my tissue paper flowers, tissue paper circles and Big Bloom Factory flowers onto the frame with Matte Medium and Glossy Accents. I finished by adding some Liquid Pearls to the pink tissue paper flower centers.


Voila! I now have a fun and vibrant frame that I can hang my photos, tags, cards and ATC's in my craft room using mini clothes pins. :o)


I sure hope I've inspired you to go bargain hunting and altering items to suit your needs. :o)

Don't forget we have our
 http://stamplorations.blogspot.com/2016/07/stencil-sunday-july-3.html
going on right now...why don't you come play along with us? 
It's always anything Mixed Media Goes except a card and you must use at least one stencil in your project. There's a $15 GC or choice of any 2 ARTplorations Stencils to be won! Plus Top Picks receive their choice of 1 ARTplorations Stencil..so come play along, you have until the end of the month to link up!


Friday, 15 July 2016

Two Paper Divas~ Pocket Full Of Blessings!

Good Morning everyone, I'm back to share with you a lil' make I made for

http://www.twopaperdivas.com/

using this month's newly released Pocket Full Of set. Such a pretty set! I LURVE it! The flowers are so easy to layer...I had a lot of fun with this set! :o)


I went shabby shic this week. I used MME DP's and paper pieced the pocket which I embossed with white EP and then stamped the sentiment in black with my MISTI. I stamped the flowers with Ranger Cool Graphite Ink and then colored them in with Alcohol Markers. I inked up some die cut Dictionary Paper circles with some VintagePhoto Distress Ink as well as the doily. Some beige and blue twine and vintage button finished it off. 


and here's the inside:
I love how this card turned out. :o)

Thank you for stoppin' by and be sure to join me next Friday to see another fun make using another of JULY'S FUN NEW RELEASES! ;o)

Wait...don't forget to check out Two Paper Divas on the blog, FB, Instagram and Pinterest for more product information, DT Inspiration and New Releases.


Sunday, 10 July 2016

Stamplorations~ Stencil Sunday 54

Hi everyone! Sharing another project for STAMPlorations Sunday Stencil. The designers have created some fabulous mixed media projects to inspire you. You can find them  here be sure to check them out and leave them some luv! :o)

Today I have a lil' tag for you using Mini Bold Florals ARTplorations Stencil and Big Bloom Factory STAMPlorations stamp set


I started with a #8 Manila Tag and used Versamark Ink thru the Mini Bold Floral ARTplorations Stencil and embossed with White EP. I then used some Distress Inks for pops of color (Dusty Concord, Worn Lipstick and Wild Honey)


I then stamped and embossed several flowers from the Big Bloom Factory onto old dictionary paper. I find this papers allows for great crinkling and shaping. I then went over them with some more Distress Inks.

I then fussy cut them out and layered them together. 

Here's a close-up of the flowers with enamel dot centers:

Thank you for stoppin' by- I sure hope I've inspired you to get crafty today! :o)

Don't forget we have our
 http://stamplorations.blogspot.com/2016/07/stencil-sunday-july-3.html
going on right now...why don't you come play along with us? 
It's always anything Mixed Media Goes except a card and you must use at least one stencil in your project. There's a $15 GC or choice of any 2 ARTplorations Stencils to be won! Plus Top Picks receive their choice of 1 ARTplorations Stencil..so come play along, you have until the end of the month to link up!