Sunday 29 January 2017

Coffee...Good til the last drop!

Happy Sunday y'all, today, I'm here to share with you a lil' Journal Page I did that was inspired by 
Vicky Papaioannou's "Take Life One Cup At A Time" Journal Page here.   I love Vicky's style and her YT videos are a lot of fun to watch. Be sure to check her out!

so here's my page:

 I started by layering pieces of CS that I cut into squares/rectangles of different sizes and adhering them to my journal using Golden Matte Medium. Once dry, I applied, Fossilized Amber, Carved Pumpkin and Barn Door Distress Paints and blending with a semi wet baby wipe. I then added Ranger Texture Paste thru the TCW "Sketch Grid" Stencil. Once dry, I stamped Prima "Messy" Stamp in StazOn Midi "Claret" and a hexagon stamp (sorry I got it in a swap, so don't know the brand) in Sepia Archival Ink

 I then cut out my teacups from the Silhouette Store 4 tea cup silhouettes by Samantha Walker and the Coffee Sentiment from Coffee Cup by Tanya Batrak. I used BasicGrey's "Curio" paper pad.   I then inked the edges with Vintage Photo Distress Ink and embossed the "Coffee" Sentiment with clear embossing powder, to get the "liquid" feel of coffee. I then adhered them with Art Basics Soft Matte Gel. I created a shadow around the cups with Vintage Photo Distress Crayon and finished with highlighting from my White Molotow Pen

I stamped the sentiment with Jet Black Archival Ink using Tim Holtz Worn Text and added some white highlights with the Molotow pen. I finished with a stamped border from an old Stampin' Up set using StazOn Olive Green Ink and some white acrylic paint splatters. 

Thank you for stoppin' by, I sure hope I've inspired you to grab a cuppa and craft! ;o)


Monday 23 January 2017

Bloobel Progressive Challenge #1~ I must Protest!

Good evening crafty friends, I'm here today with a journal page I created using the "I must Protest" Digi from
https://www.bloobel.com/blogs/news/bloobel-progressive-challenge-january-2017
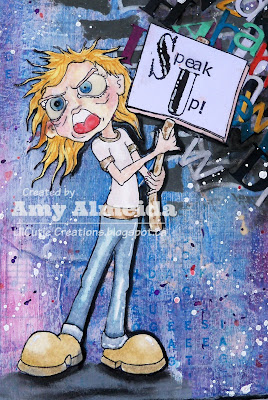
As soon as I saw the image we got to play with this month, I had an idea of having jumbled letters flowing out behind her. So she needs to SPEAK UP to get her words out to be heard. At least that's what I was trying to convey. ;o) LOL!


I created the background by layering old book paper and Tim Holtz Melange Tissue Paper. I then did a Gesso wash. Once it was dry, I used Acrylic paint in Azur Blue and Crimson mixed with Golden Glazing Medium. I blotted off some of the color with a baby wipe. I like the texture this "new to me" technique gave and will definitely using glazing medium again. ;o) I stenciled Dylusions Staggered Brickwork stencil in behind to create a "Wall" in Grey Acrylic Paint and highlighted a few with my White Uni-Posca Pen and then stamped Stampin' Up "Wordsearch" in Blue Hawaii StazOn Midi. I cut out some Upper and Lower case letters using my Curio and then colored some with Distress Paints and adhered them using Gel Medium. I then added some splatters with Dylusions Ink Sprays (White Linen, Crushed Grape and Cherry Pie) for more added texture and color.

I printed this little protester onto watercolor paper and heat set it then used Distress Markers and Waterbrush pen to watercolor. I added some white highlights with my White Uni-Posca Pen and used Ranger's Glossy Accents on her eyes as I wanted them to be bulging from her yelling...which is why I made her a little "Red in the face"...It's hard work yelling  don't ya know? hehehe I finished with some black shading on the  right side of her using a Watercolor pencil and watercolor brush.

I stamped my sentiments with Tim Holtz Mini Worn Text, Just Cre8 Scratched TailGB  and small text letters from Michael's onto tissue paper and used Gel Medium to adhere them down.


Thank you for stoppin' by tonight and  hope I've inspired you to be creative today. :o)


Sunday 22 January 2017

STAMPlorations~ Sunday Stencil~ Coffee

Happy Sunday everyone! I'm sharing a journal page I made for STAMPlorations Sunday Stencil #80. The designers have created some fabulous mixed media projects to inspire you. You can find them  here so be sure to check them out and leave them some luv! :o)

I played with  ARTplorations Bubbles- Mini stencil and a Digital Freebie from last year's Coffee Lovers Blog Hop "Latte for Two".
 I started with a tag and layered Distress Inks in Fossilized Amber, Tea Dye, Vintage Photo and Walnut Stain. I then went over the edges with the Bubbles Mini Stencil with Tea Dye Dsitress Ink for added texture. I then splattered Twinkling H20's "Cinnamon Brown" and water droplets onto the background.


I then printed the digi  twice onto watercolored paper and heat set it with my heat gun. I colored the coffee cups with Forest Green, Scarab Beetle and Iridescent Red Twinkling H2O's and cut it out once it was dry. I added Tea Dye and Fossilized Amber Distress Inks to the second Digi and cut out the frame and glued it to my tag. I then adhered the coffee cups. I finished with twine and cute "Coffee Talk" Button from Dress It Up.


Don't forget, you still have time to join in our
 January Mixed Media Challenge.

Thank you for stoppin' by :)


Friday 20 January 2017

Spread Your Wings Tag

Happy Friday Crafty Friends! Today I have a lil' Tag
I made using my new Kuretake Gansai Tambi Watercolor set.
 My fabulous bestie, Sharon, sent them to me so I had a play and I LOVE THEM!!! 
Thank you SHARON!! xx

Ok here is my little scene I created by watercoloring the background. Not bad for my first go, I'll have to keep playing with them to get the hang of them, but really like how well they blend and keep their color. :o)
I then stamped some fairies that Sharon also got me in Black Archival Ink...isn't she AMAZING???? Be sure to check out her blog and leave her some luv!! I also stamped some Impression Obsession  and Penny Black Flowers to create some foilage in the background using StazOn Midi's in Gothic Purple Blue Hawaii and Cloudy Sky. I then colored the fairy wings with Spectrum Noir  Sparkle Pens in Aquamarine and Cosmos. Love these too!! I inked around the edge with Black Soot Distress Ink and added some black and white paint splatters . I then stamped the sentiment from the Prima Finnabair "Don't Forget to Fly" set and finished with Hug Snug Black Seam Binding


Thanks for stoppin' by today and I hope to see you again soon. :o)


Wednesday 18 January 2017

Monster High Journal Page

Hi crafty friends, I have a lil' journal page to share with you today
 using Monster High Trading Cards.

 I saw these at a swap and picked them up for 50 cents last summer but am just now playing around with them. lol. 

I started by layering Dylusions Paints in Bubble Gum Pink, Cut Grass and Lemon Zest onto 2 pages of my Small Dylusions Journal. I then used black and white acrylic paints thru the Dylusions "LETTER JUMBLE" and "STAGGERED BRICKWORK" stencils.
I wanted a "Graffiti" background. :o)
 
I added some circles using a lid and white acrylic paint and then using Black and White Gelatos to color them in. I doodled on them as well with my White Uni Posca Pen. I also added some stamped bubbles with Black Archival Ink in the background, which I doodled on again with my White Uni Posca Pen and Black Fine Pitt Pen.  I fussy cut the images of the Monster High Girls from the trading cards and adhered to the base and grounded them with Recollections Washi Tapes. I finished with the sentiment (D-137) from  Digital Princess Designs and some white and black paint splatters. :o)

Here's a closer look at the images:


Thanks for stoppin' by, and I hope I've inspired you to get crafty today. :o)


Friday 13 January 2017

STAMPlorations Tutorial~ Fun with Smooshing!

Good afternoon crafty friends, I'm over on the STAMPlorations blog today with a fun tutorial for a Bookmark using the "Smooshing" Technique. 


I've laminated it to make it durable so it holds up to my book travels. ;o)
  
You can catch the full step-by-step tutorial here.  


Sunday 8 January 2017

STAMPlorations~ January Challenge!

Happy Sunday crafty friends! It's that time again...
http://stamplorations.blogspot.com/2016/08/stencil-sunday-august-7.html
A new challengestarts today at STAMPlorations! :o)


The theme is always anything mixed media goes except a card! Just remember you must use at least one stencil (any brand) in your project. You have until the end of the month to play!   

Here are some ATC's I made using ARTplorations  Stained Glass stencil and STAMPlorations Art MarksBold Sentiments: Create Bold sentiments:Explore stamp sets.


I started with a piece of watercolor paper that I had dipped into water with alcohol inks. I then blended over the Stained Glass Stencil in Mermaid Lagoon, Squeezed Lemonade and Picked Raspberry Distress Inks. I stamped randomly with stamps from the ART MARKS set and then sentiments from the CREATE and EXPLORE Bold Sentiments set in Jet Black Archival Ink. I finished with some Washi Tape and Ebony Black NuvoDrops. My finished ATC's were then matted to black cardstock as I love how it grounds and makes the design bolder. 

Here's a closer look at them:


ARTplorations: Stained Glass


There, we are another fun make using the fabulous stamps and stencils from STAMPlorations. :o) I sure hope I've inspired you to get crafty and join in our challenge. 


Wednesday 4 January 2017

The Perfect Blend

Good Morning and happy Wednesday Friends!

Today, I'm here to share a lil' card I made using the Stampin' Up! "Perfect Blend" Set.
Here is my card:
I started with a piece of watercolor paper and blended Distress Inks in Squeezed Lemonade, Tea Dye, Vintage Photo and Walnut Stain. I added some water droplets  and stamped dots in Vintage Photo for some added texture. 

I then stamped the Coffee Cup in Vintage Photo and the sleeve in Mowed Lawn and used my Waterbrush Pen to blend. I fussy cut them out and added coffee beans to the sleeve....Mmmmm Coffee!! I adhered the cup onto my card and finished with the fun sentiment in Walnut Stain and some washi tape. 

and here's the inside of my card with just the coffee beans.


Thanks for stoppin' by and I hope I've inspired you to grab a cuppa and get Crafty!