Showing posts with label Tim Holtz. Show all posts

Thursday, 27 December 2018

SCRAP N' STAMP~ Having a HOOT!


Hello Crafty Friends! 

Today, I'm up on the 
blog today with  some fun lil' tags using different coloring mediums and MFT- Warm & Feathered Hugs stamp set

For more details and photos of my card, checkout the post here.


Monday, 17 December 2018

SCRAP N' STAMP~ Cool Yule Masculine Card

Happy Monday Crafty Friends! 

Today, I'm up on the 
blog today with  a fun Masculine Christmas Card. 

For more details and photos of my card, checkout the post here.


Friday, 14 December 2018

SCRAP N' STAMP~ All That Sparkles Blog Hop

Happy Friday crafty friends! Today, we have a fun little blog hop 


Be sure to comment on all the stops on the hop to be eligible for one of 6 SPARKLY GIFT PACKS and 1 $25  Scrap N' Stamp Gift Certificate

 PLUS there's a challenge over at the SCRAP N' STAMP FB Group- the theme is ALL THAT SPARKLES...so get out your glitter, shimmer ...anything that sparkles!

So here's the card I made using a Spellbinder's Snowflakes Die as a stencil, Nuvo Glimmer Paste and Distress Oxides. 


I started with Smooth Bristol Paper and applied Spun Sugar, Worn Lipstick and Picked Raspberry Distress Oxides. I love this color combo for an ombre effect! I used one of the curved MFT- Basic Edge dies on the lower half.

 I then die cut a Spellbinder's snowflake die onto cardstock and used it as a stencil with Moonstone Nuvo Glimmer Paste to create that sparkly effect, I masked off the center before I applied the past so I could add my sentiment. I used "MERRY" from  the Concord & 9th Christmas Cottage set and stamped it onto the center of the snowflake with Versafine Crimson Red ink.  I then die cut the "Christmas" Sentiment from Silver glitter paper using the Birch Press Christmas Sugar Script Die. I also die cut it out from White CS several times and layered them all together to give it more dimension.  I then adhered the 2 panels onto my card base with fun foam and added a strip of the silver Glitter paper in between the 2 layers. 

For the inside of my card, I used the same Distress Inks from my card front with TH Mini Weathered Winter Snowflakes stamps. A sentiment from an older Cornish Heritage Farm stamp set. 


I hope I've inspired you to get crafty and play along with our ALL THAT SPARKLES challenge this month!

 Also, be sure to hop along ALL the blop stops and COMMENT to be eligible to win one of the amazing prize packages or Gift Certificate that's up for grabs!

You are now off to Kia's Blog to see her take on ALL THAT SPARKLES!

And here's the Blog Hop List, in case you get lost  along the way or are just joining in:
Amy <<You are Here>>


Friday, 16 November 2018

SCRAP N' STAMP~ November Blog Hop and MOvember Challenge

Happy Friday crafty friends! Today, we have a fun little blog hop for 
Be sure to comment on all the stops on the hop to be eligible for one of three Impression Obsession Retro Masculine Die sets!!! PLUS Scrap N' Stamp will also be donating 10% of net sales today (Hop Day) to the Movember foundation- so be sure to check out the main Blog Hop Post for more information on this great cause!

 AND there's a new challenge starting over at the SCRAP N' STAMP FB Group- the theme is to create a MOvember card which features mustaches or a masculine theme! The prize for the challenge this month is a $50 Gift Card for the SCRAP N' STAMP STORE!! Woot Woot!

So here's the card I made using the Impression Obsession Retro Masculine Die  and the Tim Holtz Hipster Cat.

For my background I die cut all the mustaches in the Impression Obsession Retro Masculine Die  set from Kraft and black cardstock that had Stick It on the back. I found it easier to keep them all together, the way they came in the package, to run them thru my Big Shot, instead of handling the smaller dies. I ran them thru about 5 times each. With the Stick it, this allowed me to adhere them to my card panel easily, as I just had to remove the backing paper. 

I then stamped the Hipster Cat onto White Cardstock with Memento Black Ink and colored him with Copics. I then fussy cut him out as I do not have the coordinating die. I die cut two circles using my Stax Cirles from Black and Kraft cardstock and then stamped the Hipster Cat onto the Kraft circle to get all the details I may have lost when I fussy cut him out. I then adhered my Hipster Cat onto my circle piece. I stacked 3 of the mustaches I had die cut from black cardstock together to get some definition- this was quite easy as the pieces still had the Stick It on the back. I then used one of the hats in the die set to give him a sharp hat to go with his retro hipster look. lol. I added  some white gelly roll highlights and added some Nuvo Crystal Glaze to his glasses. A Small Talk Sentiment finished off my cat. I then adhered the circles to my card with foam tape. 


For the inside, I kept with the same relative design that I used on the cardfront but used a Tim Holtz Random Thoughts sentiment and another stach and glasses from the die set. ;o)

I hope I've inspired you to get crafty and play along with our MOvember -stache and/or masculine challenge this month- don't forget there is a $50 gift certificate up for grabs for one Randomly chosen participant in the challenge!

 Also, be sure to hop along ALL the blop stops and COMMENT to be eligible to win one of the 3 Impression Obsession Retro Masculine Die sets!

You are now off to Nancy's Blog to see how she used this fun little die set!

And here's the Blog Hop List, in case you get lost  along the way or are just joining in:
Tara/ SNS blog
Laurie
Amy <-- You are here-->
Nancy
Kia
Jessica


Wednesday, 31 October 2018

SCRAP N' STAMP~ Treat box for you!

Happy Wednesday Crafty Friends! 

Today, I'm up on the 
blog today with  a tasty Fall Treat using Tim Holtz Funky Foliage Die Set and an Eileen Hull Trinket Box.


For more details and photos of my tag, check out the post here.


Friday, 19 October 2018

SCRAP N' STAMP~ Spooky Trouble

The weekend is almost here and to kick off our new challenges over at Scrap N' Stamp Challenges, we are having a BLOG HOP!! Wooohooo! 

You should be arriving from Nancy's blog with her adorable witchy make- I mean seriously, how sweet is her card???

The theme for this challenge is a color challenge: to use ORANGE, PURPLE and GREEN in your make.

 AND.... there's a $50 Gift Certificate up for grabs for one lucky winner!! I know, how cool is that???? AND you have until November 1st to play along. 

Wait, there's more!! For this hop there are three $25 Gift Certificates up for grabs, so be sure to comment on each stop of the hop to be eligible...woot woot!

Here's my Halloween inspired card using Tim Holtz SILLY MONSTERS along with the challenge colors: Green, Orange and Purple. Now, I'm not a huge Halloween crafter, but these lil' guys are UBER CUTE!! lol I had so much fun with these lil' monsters that I created a matching envelope too. 


For the monsters I blended Carved Pumpkin and Wilted Violet Distress Oxides onto Bristol Smooth Paper. I the splattered some water and once dry, some white and black splatters. I then die cut the sheets with the Silly Monsters Dies


I embossed some American Crafts Foil paper in Silver with a Tim Holtz Alterations die, which is similar to the 3D Foundry Embossing Folder. I added some Meadow and Black Alcohol Inks to grunge it up, because come on, they are MONSTERS...lol  I cut a slit for my one monster to peek thru and a sentiment from TH Halloween Script cut from bristol paper with Peeled Paint Distress Oxide finished off the front of my card. 


For the inside of my card, I blended Peeled Paint and Black Soot Distress Oxides and used another sentiment from the Halloween Script set along with another monster. This guy, Norm, cause he looks like a Norm, is my favorite with that look on his face..hehehehe

And here's the envelope I made:


Here's the blog hop line-up in case you are joining in here:

So be sure to comment on all the hop stops to be eligible for one of the three $25 Gift Certificates that are up for grabs! And Don't forget to check out the new Challenge Group too! You have until November 1st to enter the Challenge on FB and one random winner will be chosen to win a $50 Gift Certificate to the Scrap N' Stamp Store! Happy Creating! ;o) 


Friday, 7 September 2018

Craft Stamper~ Beauty in Simplicity

Woohooo! It's time for another Challenge over at

This month, "anything goes" as long as you have used stamping somewhere on your project. Easy peasy right? 

Our prize this month is

What a fun prize- I so want to try these! Lol


This month, I used some Tim Holtz Goodies for my cards...yep I made 2!! Woot Woot!

I used Tim Holtz (Wild Plum) and Pinata (Baja Blue and Senorita Magenta) Alcohol Inks with blending solution on Yupo paper to create the background of the first card. I normally don't use a blending tool for my Alcohol Inks, but I found by just dropping the inks onto blending solution and blowing with a straw, it left areas a bit tacky where the AI settled and the Lift Ink didn't work as well with my image. So using the blending tool helped with using the Ranger Lift Ink...for me anyways lol ;o)


I then inked up the TH butterfly stamp/sentiment with Ranger's Lift Ink and stamped onto the AI panel. I then dabbed the areas with a paper towel...just ensure you use a clean part of the paper towel as you dab at new areas to avoid color transfer. Once you've dabbed most it, just wipe away the excess and voila, you have a pretty image show up in the alcohol ink. 


With the ink left on the stamps, I stamped off the second card. I love the softness of it. :) 


I finished both cards by adhering the panels to black cardstock bases cut to 4.25"x5.5". Some Nuvo Drops finished of both cards.

I sure hope I've inspired you to get crafty today!

I can't wait to see your makes in this month's Challenge! Be sure to check out the DT's makes for more inspiration and leave them some luv. 


Monday, 23 July 2018

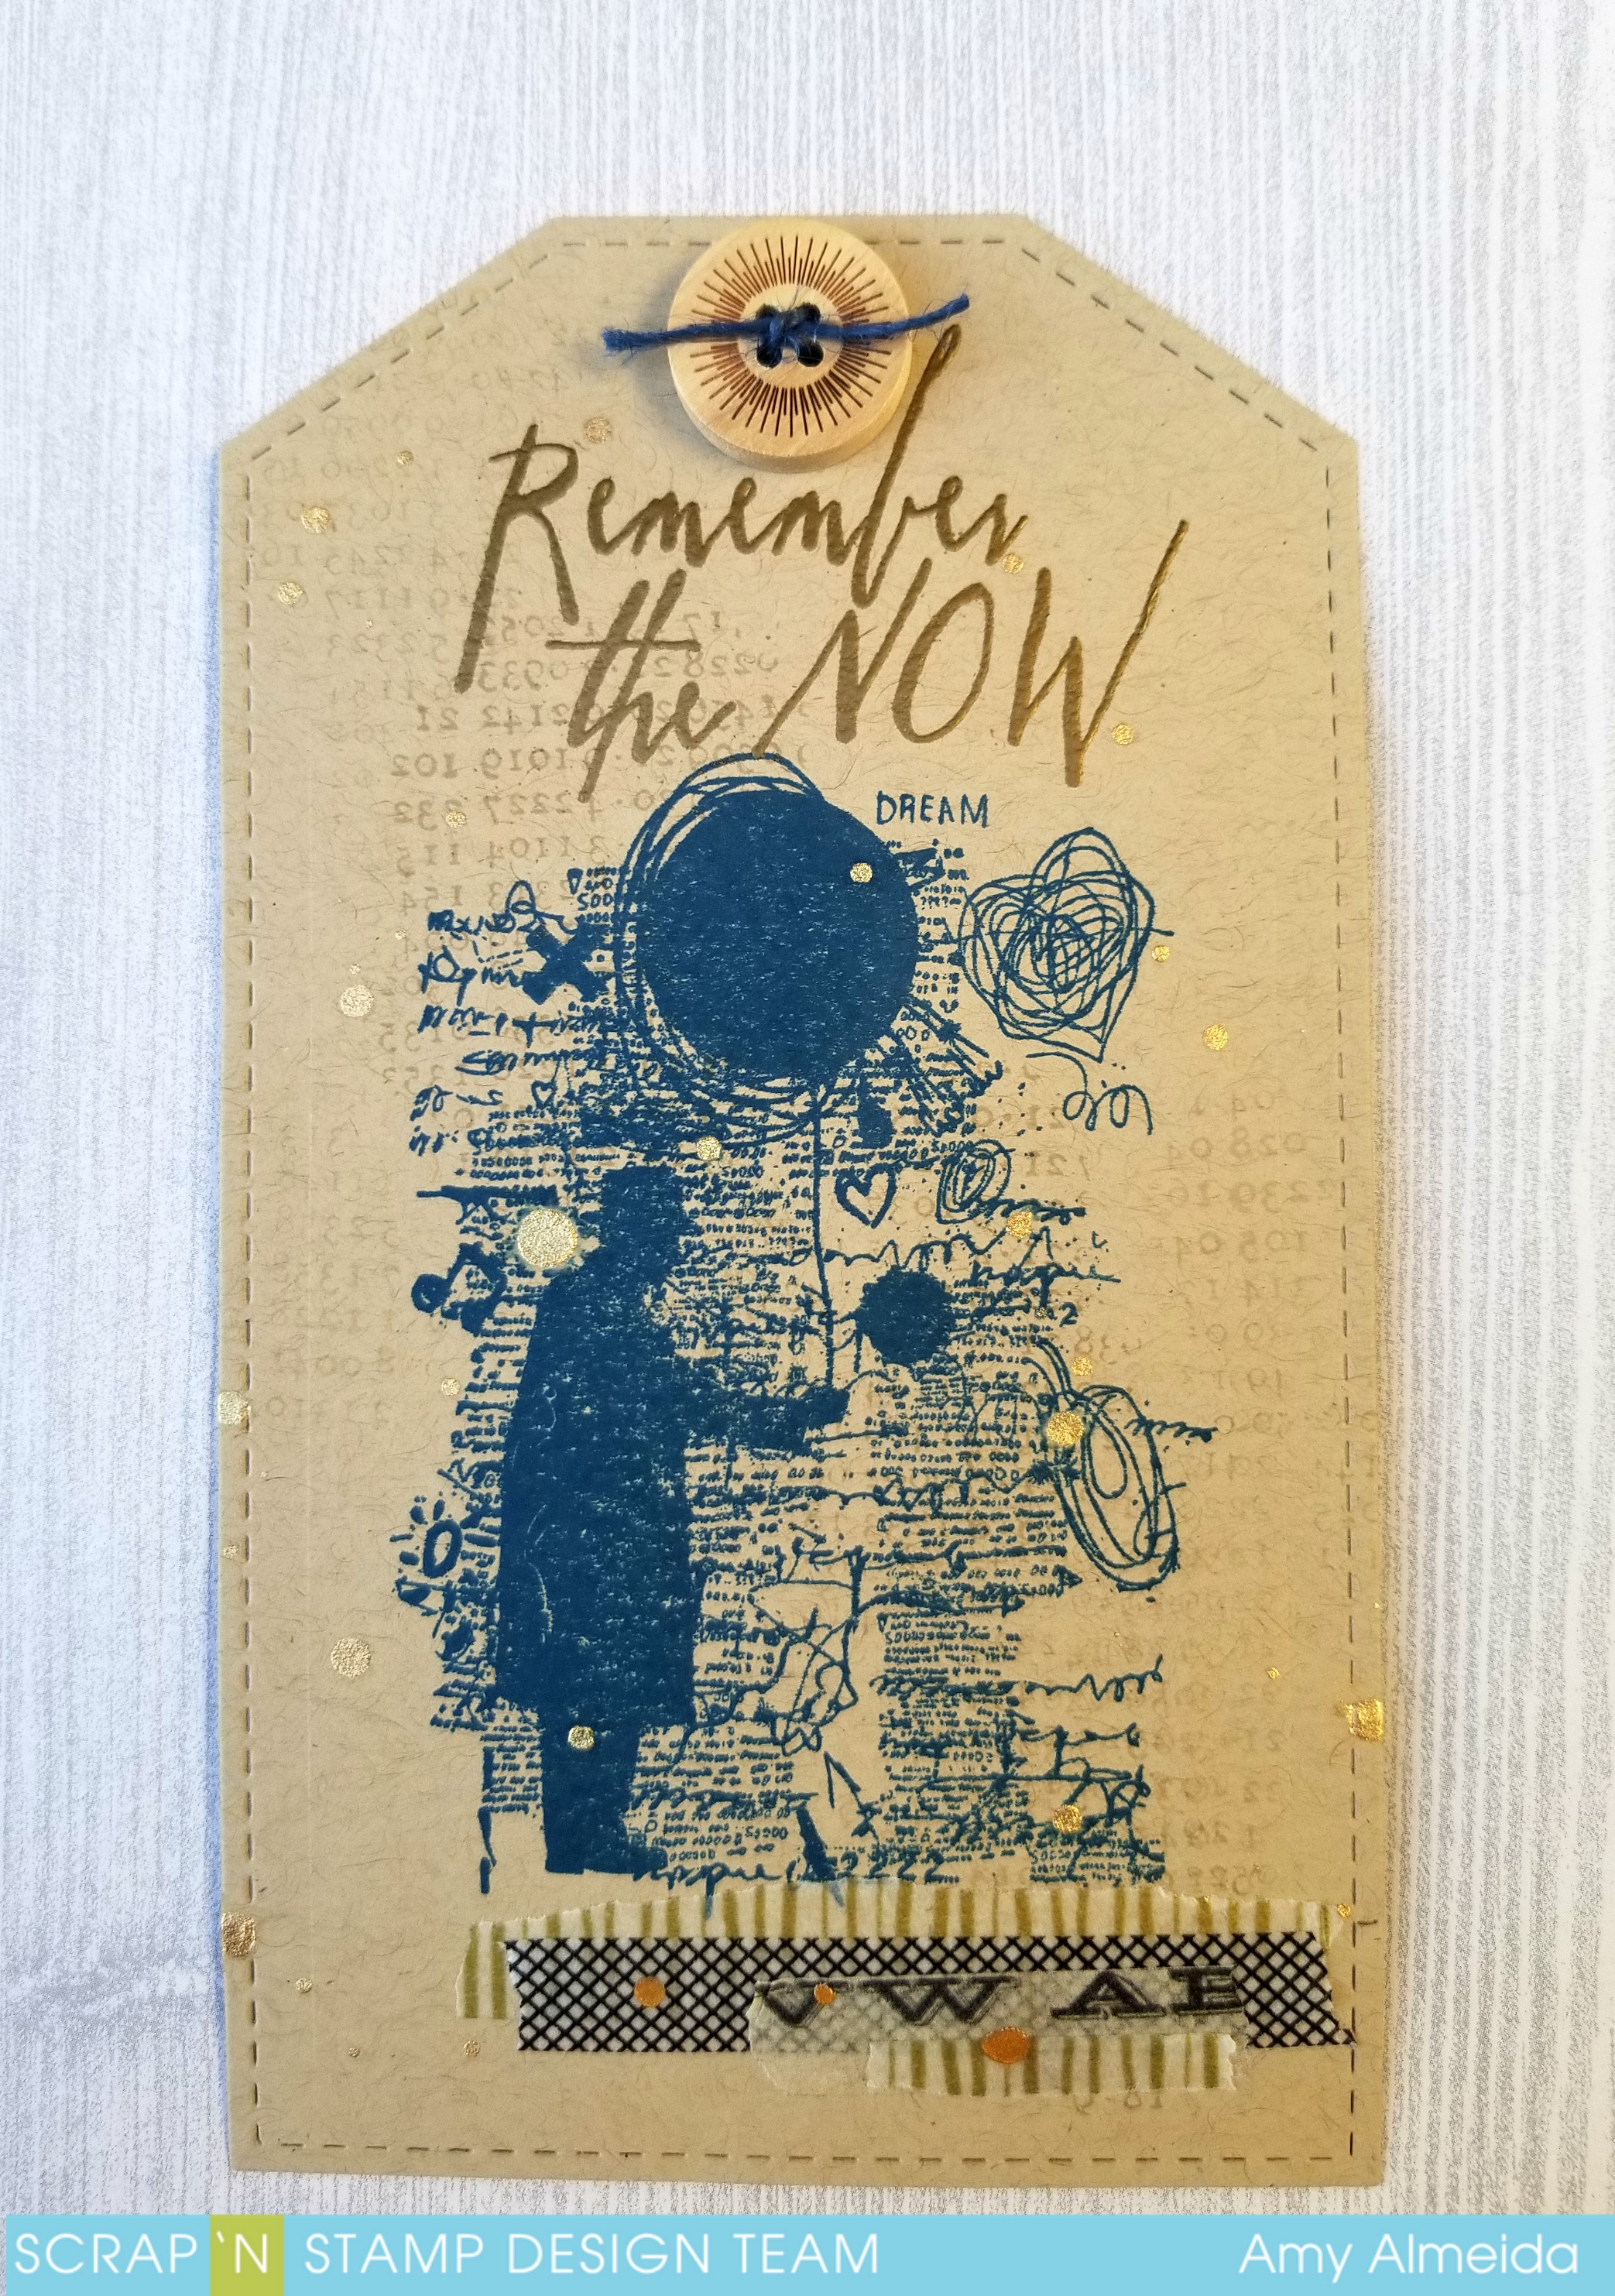
SCRAP N' STAMP~ Remember the Now!

Good morning crafty friends, today I have a clean and simple tag using Tim Holtz Theories Stamp Set.


I'm a huge Tim Holtz fan and I just love this new set of his. It can be so versatile- for so many occasions. I don't know about you, but I struggle with masculine cards/tags and this set makes it easier for me! ;o)
I love brown and blue for a color combo  and added a little gold for some "pizazz".


I added some background stamping in Memento Toffee Crunch using Tim Holtz Reflections- Numerical stamp.  and then placed the image on my tag using the Tim Holtz Stamping Platform and stamped the image with Memento Nautical Blue ink.  I find the platform makes for a crisp image every time. A definite must need in your crafty aresenal!


I then added my sentiment by embossing a Sentiment from Tim Holtz- Handwritten Thoughts with Stampendous Detail Gold Embossing Powder. I added some Gold Paint Splatters, button and some Washi Tape to finish off the tag.

Voila! A quick and easy,CAS Masculine Tag! You can check out my blog post here for more pictures.


Don't forget there is still time to join in the "Christmas in July" Blog hop- so hop on over! ;o)


Monday, 25 June 2018

SCRAP N' STAMP~ Cause a Scene

Good morning, it's time for my DT inspiration for 

Today, I have a lil' tag using a few Tim Holtz, Ranger and Prima Products. 


I started with a tag die cut from the largest Tim Holtz Sizzix Tags set and used Cracked Pistachio and Abandoned Coral Distress Paints. Once dry, I stamped numbers from the Tim Holtz "Life's Possibilities" set with Garden Patina Archival Ink.  I die cut the Damask from the Tim Holtz Mixed Media Halloween Die Set from White Cardstock and adhered to my tag using Nuvo Deluxe Adhesive


I adhered some Finnabair Mini and Small Art Stones with Finnabair Soft Matte Gel. Once dry, I colored with Distress Stains in Cracked Pistachio and Abandoned Coral with a waterbrush. I added a Tim Holtz Paper Doll and Snarky Small Talk Stickers with some Dylusions Post-Box Red Paint Pen around them. Some white splatters, using Dylusions White Linen Spray, finished off my Tag. :o)

I sure hope I've inspired you to get crafty and play with some different mediums. 


Friday, 8 June 2018

CRAFTSTAMPER~ Just Leap!

Woohooo! It's time for another Challenge over at

This month, "anything goes" as long as you have used stamping somewhere on your project. Easy peasy right? 

Our generous sponsor this month is
There are 3 beautiful Stamp Sets and one fun Stencil up for grabs for this month's amazing prize!!


How sweet is this prize pack???
For  all the challenge details and for linking your entry please visit the Craft Stamper blog *here*

For this month's make, I used the fun new THEORIES Set by Tim Holtz along with my Bombay India Inks. 


I started by adding water to my Watercolor panel and then dropping in Magenta and Yellow Bombay Inks. These are great for layering one at a time, as once dry they are permanent and layer beautifully! Plus, I love the vibrancy of the colors. 


I then stamped the image in Black  Onyx Versafine Ink using my TH Platform. I then added the sentiment using the Black Onyx Versafine Ink and then used second generation stamping with Archival Sunflower and Memento Rose Bud inks. Some black splatters and Black Nuvo Drops finished off the card. :o)


I sure hope I've inspired you to get Crafty today and can't wait to see your makes in this month's Challenge! Be sure to check out the DT's makes for more inspiration here